Tutorial Part 4.4: Unit Testing
In this tutorial, we'll be taking a closer look at qooxdoo's integrated unit testing framework. Armed with this new knowledge, we'll then define a few unit tests for the tweets application created in previous tutorials, generate the test runner application, and watch the tests in action. As usual, the code can be found on GitHub.
Background
qooxdoo's unit testing framework is similar to JSUnit but self-contained, so no external libraries are necessary. It consists of two main components:
The classes in the qx.dev.unit namespace provide the interface against which tests are written and the infrastructure needed to run them. The Testrunner component (located in the qooxdoo SDK's component/testrunner directory) provides a GUI to select and run tests and visualize the results.
Test class structure
The actual test code is contained in classes living within the namespace of the tested application, located in the source/class/<$APPLICATION>/test directory by default. A fresh qooxdoo application skeleton (GUI, Inline or Native flavor) contains a simple test class named DemoTest:
qx.Class.define("tweets.test.DemoTest",
{
  extend : qx.dev.unit.TestCase,

  members :
  {
    /*
    ---------------------------------------------------------------------------
    TESTS
    ---------------------------------------------------------------------------
    */

    /**
    * Here are some simple tests
    */
    testSimple : function()
    {
      this.assertEquals(4, 3+1, "This should never fail!");
      this.assertFalse(false, "Can false be true?!");
    },

    /**
    * Here are some more advanced tests
    */
    testAdvanced: function ()
    {
      var a = 3;
      var b = a;
      this.assertIdentical(a, b, "A rose by any other name is still a rose");
      this.assertInRange(3, 1, 10, "You must be kidding, 3 can never be outside [1,10]!");
    }
  }
});
All test classes share the same basic structure:
- They must inherit from qx.dev.unit.TestCase
- Individual tests must be defined as member functions with names beginning with test. Apart from that, they can contain other member functions, properties and so on. Usually, test functions instantiate classes of the tested application, invoke their methods and compare the results with expected values.
- Exceptions are used to communicate the test results back to the Testrunner. No exception means the test went fine, throwing any exception from the test method signals a failure. Return values from the test methods are not evaluated.
qx.dev.unit.TestCase includes the assertion functions from qx.core.Assert. These can be used to check values, e.g. by comparing a tested method's return value to an expected value. If the assertion fails, a qx.core.AssertionError is thrown.
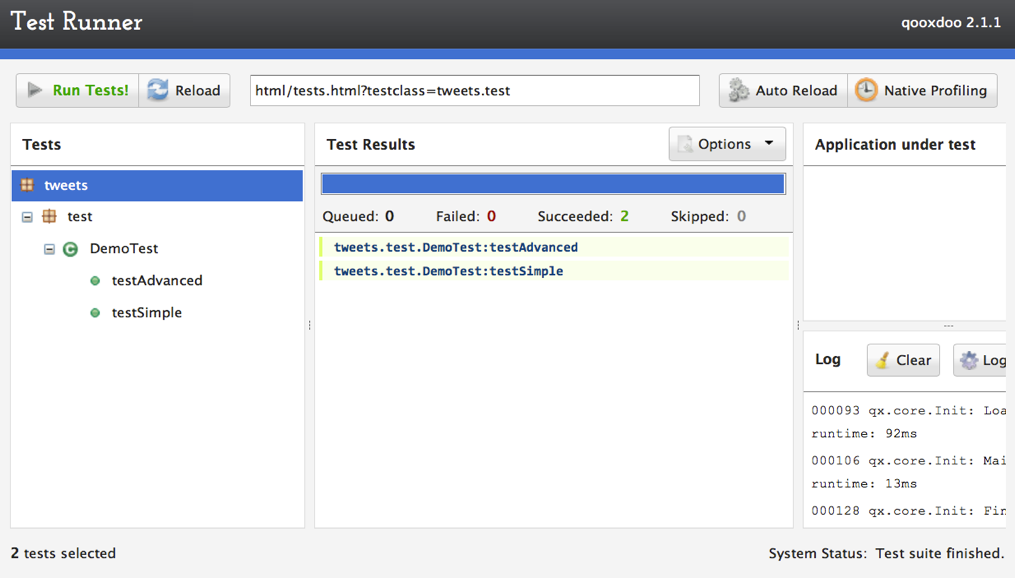
Building and running the test application
In the top-level directory of the tweets tutorial application, run generate.py test. This command builds both a stand-alone application containing the test classes (the AUT, or "application under test") and the Testrunner GUI which loads the AUT in an Iframe and visualizes the results. Load the Testrunner by opening the file test/index.html in your favorite browser and tap the "Run Tests" button.
Note
Some browsers, such as Google Chrome, severely restrict scripts from loading resources from the file system. In this case, the Testrunner should be loaded from a web server.
Creating a new test class
Now that we've got the basics covered, let's create some more meaningful tests for our tweets application, starting with the tweets.TweetView class. As you'll remember from the previous tutorials, it's responsible for displaying a single Tweet along with the user's icon. To this end, it has a property named icon with an apply method that sets the source property on the TweetView's icon child control. Our test will check if the icon property value is correctly applied to the icon widget. First of all, create a corresponding class tweets.test.TweetView in the source/class/tweets/test directory. (We won't be needing the DemoTest class any more, so feel free to delete it.)
/**
 * @asset(tweets/logo.png)
 */
qx.Class.define("tweets.test.TweetView",
{
  extend : qx.dev.unit.TestCase,

  members :
  {
    setUp : function()
    {
      this.__tweetView = new tweets.TweetView();
    },

    tearDown : function()
    {
      this.__tweetView.dispose();
      this.__tweetView = null;
    },

    testSetIcon : function()
    {
      var expectedSource = qx.util.ResourceManager.getInstance().toUri("logo.png");
      this.__tweetView.setIcon(expectedSource);
      var foundSource = this.__tweetView.getChildControl("icon").getSource();
      this.assertEquals(expectedSource, foundSource, "Icon source was not set correctly!");
    }
  }
});
Setting up and tearing down
Note the setUp and tearDown methods. Each test class can contain either or both (or none). setUp is called before each individual test function and is used to perform common initializations. Similarly, tearDown is called after each test method (even if the test failed), e.g. to dispose objects created by setUp or the test itself. Together, they can be used to make sure each test method runs in a "clean" environment: In this case, we create a new instance of the tested class for each test and dispose it afterwards, which is a very common pattern in unit testing.
The tearDown logic is actually quite an important part of developing unit tests since tests that don't clean up after themselves can lead to nasty dependencies where test B will pass when run individually but fail when run after test A. Singletons are particularly vulnerable since their state carries over between tests. So if, for example, test A checks how a class reacts to a locale change by calling qx.locale.Manager.getInstance().setLocale while test B relies on the locale still being the application's default, B would fail whenever A ran first.
For cases where the generic class-wide tearDown isn't enough, methods using the naming convention tearDown<TestName> can be defined. A method named e.g. tearDownTestFoo would be called after testFoo and the generic tearDown of the class were executed.
The test function
We need the URI of a valid image for this test, so we add an @asset hint to the class header that will cause the Generator to add the file source/class/tweets/resource/logo.png to the AUT's resources. In the test function, we first ask qooxdoo's resource manager to resolve the resource ID into a valid URI. This is the expected value for the icon child control's source property. Next, we apply this value to the TweetView's icon property, then get the child control's source property and compare the two values using assertEquals.
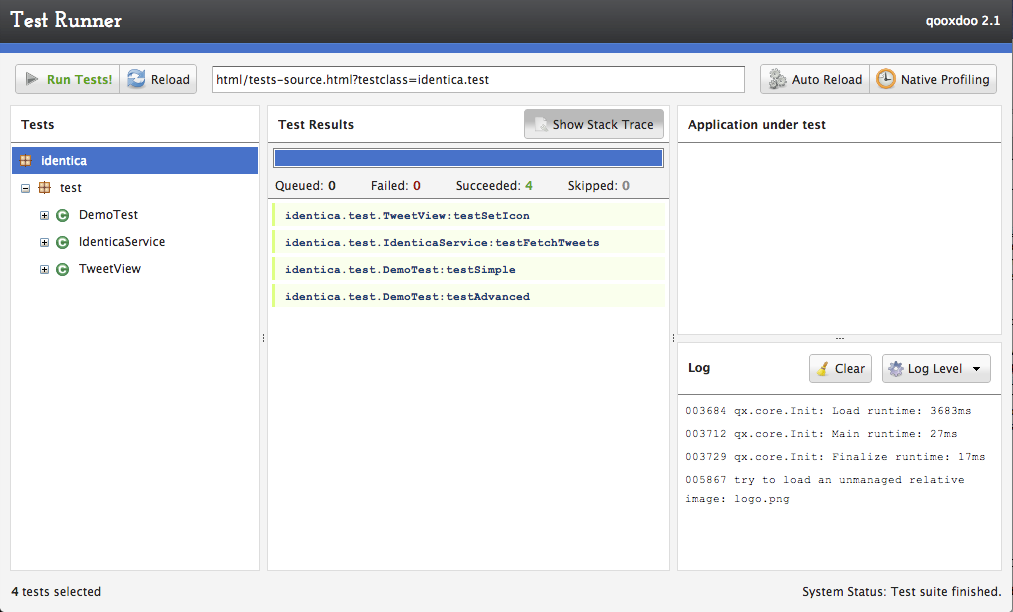
OK, time to build the AUT again. This time, run generate.py test-source instead of test. As you might expect, this will generate a source version of the AUT, which, like the source version of the actual application, is far better suited for development. Open the file test/index-source.html to load the Testrunner with the source tests.
Asynchronous Tests
As with many GUI applications, the various components of the tweets app use events to communicate. The tweets.IdenticaService class, for example, has a method fetchTweets that causes a changeTweets event to fire once the data store has finished (re)loading. We can't know in advance just how long this takes, so we need some way to instruct the test to wait until the event fires. This is where asynchronous testing comes in.
Once again, create a new test class named tweets.test.IdenticaService. The setUp and tearDown methods are mostly identical to the ones from tweets.test.TweetView, except of course they initialize/destroy an instance of tweets.IdenticaService instead. Here's the actual test function:
testFetchTweets : function()
{
  this.__identicaService.addListener("changeTweets", function()
  {
    this.resume();
  }, this);

  this.__identicaService.fetchTweets();

  this.wait(5000);
}
First, we register a listener for the changeTweets event. The callback function invokes the resume method, which informs the Testrunner that the asynchronous test has finished. We could pass a function parameter to resume if, for example, we wanted to check the data associated with the changeTweets event, but for now we just want to verify that it fires at all.
Next, we invoke the fetchTweets method which should cause the event to fire.
Finally, the wait method informs the Testrunner that it should wait for a resume call. The first argument is the amount of time to wait (in milliseconds) before the test is marked as failed. Note that wait must always be the last call in an asynchronous test function. Any code that follows it will never be executed.
Now, if you run this test a couple times in quick succession, there's a good chance it will at some point fail with the error message "Error in asynchronous test: resume() called before wait()". This is because due to the browser caching the result of the identica API request sent by TweetService, the changeTweets listener callback is executed immediately after calling fetchTweets. This is a common problem in asynchronous tests, encountered whenever the tested code's behavior can be synchronous or asynchronous depending on external factors. Luckily, there's a simple fix for it: We just wrap the problematic method call in a timeout to make sure it's executed after wait():
qx.event.Timer.once(function() {
  this.__identicaService.fetchTweets();
}, this, 100);
While we could use a simple window.setTimeout for this, it's preferable to use Timer.once since it uses qooxdoo's global error handling to catch and log any exceptions that might be thrown in the callback code. Otherwise, these would just land on the browser console.
Requirements
Finally, let's take a quick look at test requirements. This is a way to define preconditions that must be satisfied before a test can be run. If a requirement isn't met, the test will be skipped (and marked as such in the Testrunner GUI). Common requirements are:
- The test checks browser-specific behavior, so it should only be run in selected browsers
- The tested class performs secure backend communication, so the test should only execute if the AUT was loaded over HTTPS
In order to use requirements, you need to include the Mixin qx.dev.unit.MRequirements in your test class. Requirements are defined by calling the require method with an array of requirement ID strings as the only parameter. Usually, this will be the first call in either a test function or the setUp method. Requirement IDs are evaluated by looking for a method name beginning with "has" followed by the requirement ID (starting with a capital letter) on the current test class and its ancestors. The method is called and its return value is checked: true means the requirement is met and the test can proceed, false means the test won't be executed and the Testrunner GUI will list it as "skipped".
While qx.dev.unit.MRequirements contains a number of "has" methods for common scenarios, requirements are often application-specific and so test developers will implement their own checks in the test class itself, a common base class or a mixin.
And that's it for a first look at unit testing for qooxdoo applications. Note that qooxdoo comes with a wrapper for the powerful Sinon.js testing framework, which offers spies, stubs and mock objects that allow testing the very internals of a class, such as if and how many times a specific method was invoked. But that's a topic for a separate tutorial.