Hello World
This tutorial is a fast-paced, high-level tour de force, to get you acquainted with working with the SDK. For that purpose we will create a minimal Desktop application.
Set up the Framework
To follow this, make sure your computer meets the requirements for the SDK as outlined on the SDK Requirements page. Go to the download page and grab the latest stable Desktop component. After downloading, all you have to do is to unzip the archive to a suitable path on your hard drive.
Create your Application
It is easy to setup your own application using the platform-independent script create-application.py in the tool/bin path of the SDK. It will create a skeleton application in a directory you specify, that is automatically configured to work with your version of the qooxdoo framework.
To create a new skeleton with create-application.py you will need to follow some initial platform-dependent steps - even when the rest of your development is independent of the platform. Please see the appropriate section below for Windows , Cygwin or Mac , Linux
Note
If you have any problems setting up the qooxdoo tool chain, please see some additional help for troubleshooting.
Windows  
Open a command shell like cmd or PowerShell. Let's create an application named custom in the current directory, with the qooxdoo SDK available at C:\qooxdoo-5.0.2-sdk:
C:\qooxdoo-5.0.2-sdk\tool\bin\create-application.py --name=custom
Cygwin  
Open a command shell like bash. To create your application custom in the current directory, with the qooxdoo SDK available at C:\qooxdoo-5.0.2-sdk, call the script as follows:
/cygdrive/c/qooxdoo-5.0.2-sdk/tool/bin/create-application.py --name=custom
Mac  , Linux
Open a command shell like bash. To create an application custom in the current directory, with a qooxdoo SDK available at /opt/qooxdoo-5.0.2-sdk, call the script as follows:
/opt/qooxdoo-5.0.2-sdk/tool/bin/create-application.py --name=custom
Run your Application
Now that your application is set up, let's generate a version that can be opened in your browser. Change to the newly created application directory and kick off the automatic build process:
cd custom
generate.py source-all
Under non-Windows systems you might have to prefix the command with the local directory, i.e. execute ./generate.py source-all instead.
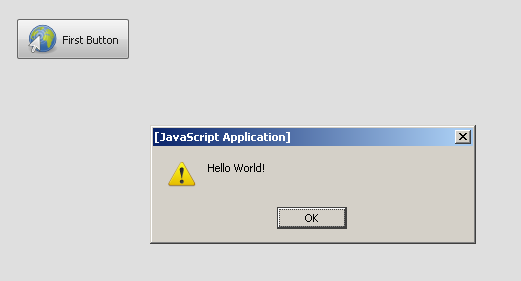
Now that the application has been generated, open the source/index.html file in your web browser to run your application and tap the button:
As you go on with your application development it might be advantageous to run your application through a web server. So alternatively to opening source/index.html in the browser directly, you can start a local mini- web server by issuing the following command on the shell
generate.py source-server
Watch the output of the command, it will tell you the URL under which your source application is available over the web server (Just copy-paste it to the location field of your web browser). Once you're done hit Ctrl-C in the shell window to terminate the server process.
Write Application Code
The folder source/class contains all application classes. When starting with a newly created application, there is only a single file for application logic, custom/Application.js. Open it in your favorite editor or IDE.
The method main() contains the entire code of your little skeleton app. Even if you haven't done any qooxdoo programming before, you should be able to figure out what the code does. Get familiar with the code and change it, e.g. modify the label of the button, move the button to another position or add a second button.
To see the changes, you just have to refresh your document in the browser, e.g. by hitting F5. During development there usually is no need to re-generate this so-called "source" version of your app. Only if you later introduce new classes or if dependencies between classes change, you would have to re-generate your app. To do so, execute generate.py source-all (to include all source classes) or generate.py source (to only include the required classes) before refreshing your browser.
Debugging
In your newly created application you should have noticed the following code:
if (qx.core.Environment.get("qx.debug"))
{
  qx.log.appender.Native;
  qx.log.appender.Console;
}
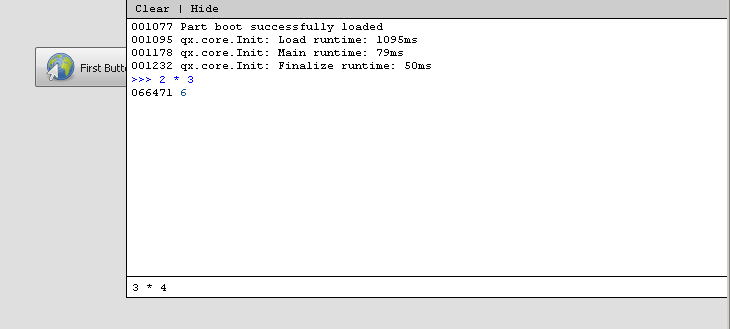
This code turns on two different ways of "logging", i.e. capturing and printing out information about the operation of your application.
qx.log.appender.Native uses the native logging capabilities of your client if available, e.g. Firebug in Firefox (use F12 to toggle). If your browser doesn't come with developer-friendly logging, qx.log.appender.Console provides such a feature for all browsers: the console prints out the log messages in an area inside your browser window. It also includes an interactive JavaScript shell (use F7 to toggle):
The reason for enclosing the two logging classes in a so-called "debug" variant is explained in more detail in the next section. It ensures that logging is only turned on in the development version (i.e. "source" version) of your app. It will automatically be turned off in the final version of your app that is to be deployed.
Deployment
The development version of a qooxdoo app is called the "source" version, the deployment version of an app is called "build" version. The latter is similarly created by executing
generate.py build
After successful completion let the browser open index.html from the newly created build folder. Although you probably won't see a difference between this deployment version of your app and the previous "source" version, it should have started up faster.
Unlike the "source" version, with its numerous unmodified JavaScript files, the "build" version only has to load a single, optimized JavaScript file.
Manually creating such a "custom build" from your application class (or classes) would have been a very tedious and complex job. In fact most other JavaScript libraries do provide built-in support to automate this task. Building your app strips off unneeded whitespaces and comments, optimizes and reorganizes your code, uses a JS linker to only include classes that your application needs, and many more refinements and optimizations as well.
A lot of debugging code is also removed when a "build" is generated that would only be useful during development of your application, e.g. printing out informative warnings or coding hints. Just like the logging code in the section above, you can put arbitrary code into such "variants", which may then be automatically removed during "conditional compilation" of the build process. This lets you receive information on your app when you're developing it, but removes this for your final code, so your end users don't see it.
API Reference
qooxdoo supports inline comments that are similar to Javadoc or JSDoc comments. They allow for JavaScript and qooxdoo specific features, and look like /** your comment */.
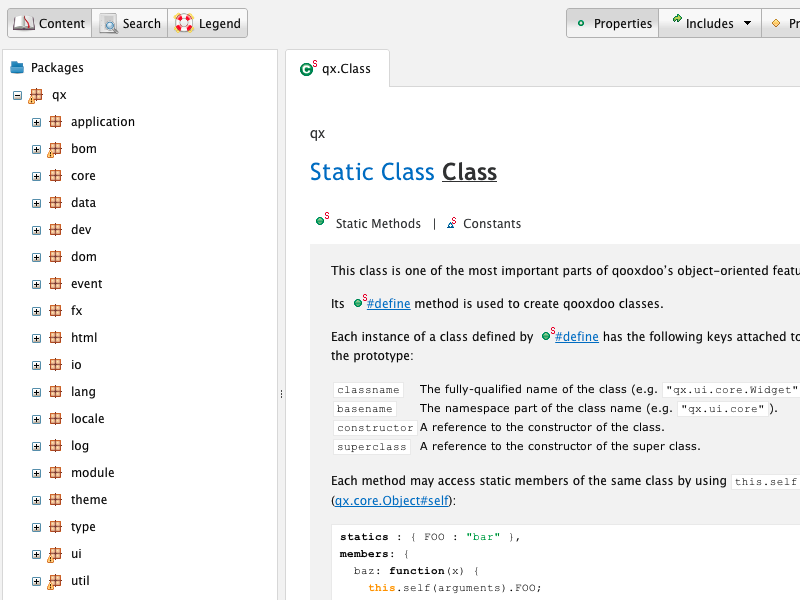
From those comments a complete, interactive API reference can be generated:
generate.py api
To start the API Viewer application, open index.html from the newly created api folder in your browser. It includes fully cross-linked and searchable documentation of your application classes as well as the framework classes.
Unit Testing
You might have noticed the test/DemoTest.js file in the source/class folder of your application. This class demonstrates how to define "unit tests" for your application. qooxdoo comes with its own unit testing framework, it does not require any additional software installation. Simply execute the following command:
generate.py test
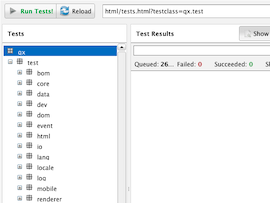
Open index.html from the newly created top-level test folder in your browser. The Testrunner application allows you to select and run the tests under your application namespace:
You may skip the rather advanced topic of unit tests while continuing to extend your custom application code. In case you are interested in test-driven development and creating your own unit tests, please see the corresponding Unit Testing documentation.