Note
This tutorial is outdated! twitter changed its API and does not allow basic authentication anymore. Still, the qooxdoo part is valid and worth trying even if you can not access you friends timeline anymore.
In the previous steps of this tutorial, we laid the groundwork for a Twitter client application, gave it a neat UI and implemented a communication layer. One thing this application still lacks is a nice way for users to input their Twitter user name and password in order to post a status update. Fortunately, qooxdoo comes with a forms API that takes the pain out of creating form elements and handling user input.
Before we get started, make sure you're working on the version of the Twitter tutorial application tagged with "Step 3" in the GitHub repository. This includes the posting part of the communication layer that we'll be using in this tutorial.
We want to create a new window with user name and password fields that pops up when the Twitter application starts. The values will be used to retrieve the user's list of Tweets. Seems simple enough, so let's get right down to business.
We start by creating a new class called twitter.LoginWindow that inherits from qx.ui.window.Window, similar to the MainWindow class from the first part of this tutorial:
qx.Class.define("twitter.LoginWindow",
{
  extend : qx.ui.window.Window,
  construct : function()
  {
    this.base(arguments, "Login", "twitter/t_small-c.png");
  }
});
The Login window will only contain the form, which takes care of its own layout. So for the window itself, a Basic layout will suffice. We'll also make the window modal:
var layout = new qx.ui.layout.Basic();
this.setLayout(layout);
this.setModal(true);
Now it's time to add a form and populate it with a pair of fields:
var form = new qx.ui.form.Form();
var username = new qx.ui.form.TextField();
username.setRequired(true);
form.add(username, "Username", null, "username");
var password = new qx.ui.form.PasswordField();
password.setRequired(true);
form.add(password, "Password", null, "password");
Note how the fields are marked as required. This is a simple kind of validation and in this case it's all we need, which is why the third argument for form.add is null instead of a validation function. Required fields will be displayed with an asterisk (*) next to their label.
The next step is to add a dash of data binding awesomeness:
var controller = new qx.data.controller.Form(null, form);
var model = controller.createModel();
Just like in the previous tutorial, we create a controller without a model. Then, we ask the controller to create a model from the form's elements. This model will be used to serialize the form data.
The form still needs a "submit" button, so we'll add one, plus a "cancel" button to close the window:
var loginbutton = new qx.ui.form.Button("Login");
form.addButton(loginbutton);
var cancelbutton = new qx.ui.form.Button("Cancel");
form.addButton(cancelbutton);
cancelbutton.addListener("execute", function() {
  this.close();
}, this);
That's all the elements we need, let's get them displayed. We'll let one of qooxdoo's built-in form renderer classes worry about the form's layout:
var renderer = new qx.ui.form.renderer.Single(form);
this.add(renderer);
The renderer is a widget, so we can just add it to the window. In addition to the standard renderers, it's fairly simple to create a cusstom renderer by subclassing qx.ui.form.renderer.AbstractRenderer, though that's outside the scope of this tutorial.
Similar to MainWindow, we'll use an event to notify the other parts of our application of changes to the form. As you'll remember, the "event" section is on the same level as the constructor in the class declaration:
events : {
  "changeLoginData" : "qx.event.type.Data"
},
Then we add a listener to the submit button that retrieves the values from the model object and attaches them to a data event, making sure the form validates, i.e. both fields aren't empty.
loginbutton.addListener("execute", function() {
  if (form.validate()) {
    var loginData = {
      username : controller.getModel().getUsername(),
      password : controller.getModel().getPassword()
    };
    this.fireDataEvent("changeLoginData", loginData);
    this.close();
  }
}, this);
Now to integrate the login window with the other parts of the application. Twitter's friends timeline uses .htaccess for authentication so we can add the login details to the request sent by TwitterService.fetchTweets():
fetchTweets : function(username, password) {
  if (this.__store == null) {
    var login = "";
    if (username != null) {
      login = username + ":" + password + "@";
    }
    var url = "http://" + login + "twitter.com/statuses/friends_timeline.json";
    this.__store = new qx.data.store.Jsonp(url, null, "callback");
    this.__store.bind("model", this, "tweets");
  } else {
    this.__store.reload();
  }
},
All that's left is to show the login window when the application is started and call fetchTweets with the information from the changeLoginData event. In the main application class, we'll create an instance of twitter.LoginWindow, position it next to the MainWindow and open it:
this.__loginWindow = new twitter.LoginWindow();
this.__loginWindow.moveTo(320,30);
this.__loginWindow.open();
And finally, we'll attach a listener to changeLoginData:
this.__loginWindow.addListener("changeLoginData", function(ev) {
  var loginData = ev.getData();
  service.fetchTweets(loginData.username, loginData.password);
});
Note how all the other calls to service.fetchTweets can remain unchanged: By making the login window modal, we've made sure the first call, which creates the store, contains the login data. Any subsequent calls (i.e. after reloading or posting an update) will use the same store so they won't need the login details.
OK, time to run generate.py and load the application in a browser to make sure everything works like it's supposed to.
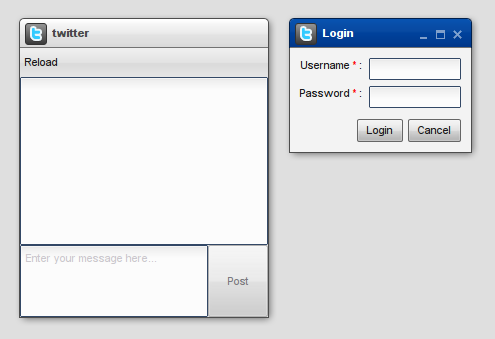
Twitter client application with login window
And that's it for the form handling chapter. As usual, you'll find the tutorial code on GitHub. Watch out for the next chapter, which will focus on developing your own custom widgets.