After we created the application and the main window in the first tutorial part and finished the UI in the second, we will build the communication layer today. With that part the application should be ready to use.
First, we need to specify what's the data we need to transfer. For that, we need to take a look what tasks our application can handle:
So it's clear that we need to fetch the public timeline (that's how it is called by twitter), and we need to post a message to twitter. It's time to take a look at the twitter API so that we know what we need to do to communicate with the service. But keep in mind that we are still on a website so we can't just send some POST or GET requests due to cross-site scripting restrictions. The one thing we can and should do is take advantage of JSONP. If you have never heard of JSONP, take some time to read the article on ajaxian to get further details.
Now, that we know how we want to communicate, we can tackle the first task, fetching the public timeline. twitter offers a JSONP service for that which we can use. Luckily, there is no login process on the server side so we don't need to bother with that in the client. The following URL returns the public timeline wrapped in a JavaScript method call (that's what JSONP is about):
http://api.twitter.com/1/statuses/public_timeline.json?callback=methodName
Now we know how to get the data from twitter. Its time for us to go back to the qooxdoo code. It is, like in the case of the UI, a good idea to create a separate class for the communication layer. Therefore, we create a class named TwitterService. We don't want to inherit from any advanced qooxdoo class so we extend straight from qx.core.Object. The code for that class should looks like this:
qx.Class.define("twitter.TwitterService",
{
  extend : qx.core.Object,
  members :
  {
  }
});
As you can see, we omitted the constructor because we don't need it currently. But we already added a members block because we want to add a method named fetchTweets:
fetchTweets : function() {

}
Now it's time to get this method working. But how do we load the data in qooxdoo? As it is a JSONP service, we can use the JSONP data store contained in the data binding layer of qooxdoo. But we only want to create it once and not every time the method is called. Thats why we save the store as a private instance member and check for the existence of it before we create the store. Just take a look at the method implementation to see how it works.
if (this.__store == null) {
  var url = "http://api.twitter.com/1/statuses/public_timeline.json";
  this.__store = new qx.data.store.Jsonp(url, null, "callback");
  // more to do
} else {
  this.__store.reload();
}
We already added the code in case the store exists. In that case, we can just invoke a reload. I also mentioned that the instance member should be private. The two underscores (__) mark the member as private in qooxdoo. The creation of the store or the reload method call starts the fetching of the data.
But where does the data go? The store has a property called model where the data is available as qooxdoo objects after it finished loading. This is pretty handy because all the data is already wrapped into qooxdoo objects! Wait, hold a second, what are qooxdoo properites? Properties are a way to store data. You only need to write a definition for a property and qooxdoo will generate the mutator and accessor methods for that property. You will see that in just a few moments.
We want the data to be available as a property on our own service object. First, we need to add a property definition to the TwitterService.js file. As with the events specification, the property definition goes alongside with the members section:
properties : {
  tweets : {
    nullable: true,
    event: "changeTweets"
  }
},
We named our property tweets and added two configuration keys for it:
The real advantage here is the event key which tells the qooxdoo property system to fire an event every time the property value changes. This event is mandatory for the whole data binding we want to use later. But that's it for setting up a property. You can find all possible property keys in the documentation.
Now we need to connect the property of the store with the property of the twitter service. That's an easy task with the single value binding included in the qooxdoo data binding. Just add the following line after the creation of the data store:
this.__store.bind("model", this, "tweets");
This line takes care of synchronizing the two properties, the model property of the store and the tweets property of our service object. That means as soon as data is available in the store, the data will also be set as tweets in the twitter service. Thats all we need to do in the twitter service class for fetching the data. Now its time to bring the data to the UI.
For that task we need to go back to our Application.js file and create an instance of the new service:
var service = new twitter.TwitterService();
You remember the debug listener we added in the last tutorial? Now we change the reload listener to fetch the tweets:
// reload handling
main.addListener("reload", function() {
  service.fetchTweets();
}, this);
Thats the first step of getting the data connected with the UI. We talk the whole time of data in general without even knowing how the data really looks like. Adding the following lines shows a dump of the fetched data in your debugging console.
service.addListener("changeTweets", function(e) {
  this.debug(qx.dev.Debug.debugProperties(e.getData()));
}, this);
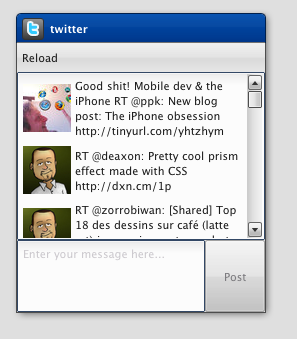
Now it's time for a test. We added a new classes so we need to invoke the generator and load the index file of the application. Hit the reload button of the browser and see the data in your debugging console. The important thing you should see is that the data is an array containing objects holding the items we want to access: the twitter message as text and "user.profile_image_url" for the users profile picture. After evaluating what we want to use, we can delete the debugging listener.
But how do we connect the available data to the UI? qooxdoo offers controllers for connecting data to a list widget. Thats the right thing we need in that case. But we currently can't access the list of the UI. Thats something we need to change.
Switch to the MainWindow.js file which implements the view and search for the line where you created the list. We need to implement an accessor for it so its a good idea to store the list as a private instance member:
this.__list = new qx.ui.form.List();
Of course, we need to change every occurance of the old identifier list to the new this.__list. Next, we add an accessor method for the list in the members section:
getList : function() {
  return this.__list;
}
That was an easy one! Now back to the application code in Application.js. We need to set up the already mentioned controller. Creating the controller is also straight forward:
// create the controller
var controller = new qx.data.controller.List(null, main.getList());
The first parameter takes a model we don't have right now so we just set it to null. The second parameter takes the target, the list. Next, we need to specify what the controller should use as label, and what to use as icon:
controller.setLabelPath("text");
controller.setIconPath("user.profile_image_url");
The last thing we need to do is to connect the data to the controller. For that, we use the already introduced bind method, which every qooxdoo object has:
service.bind("tweets", controller, "model");
As soon as the tweets are available the controller will know about it and show the data in the list. How about a test of the whole thing right now? You need (again) to tell the generator to build the source version of the application.
After the application has been loaded in the browser, I guess you see nothing until you hit the reload button of the UI. That's one thing we have to fix: Load the tweets at startup. Two other things are not quite the way we want them to be: The tweets get cut off at the end of the list, and the icons can be delivered by twitter in different sizes. So let's fix those three problems.
The first thing is quite easy. We just add a fetch at the end of our application code and that will initiate the whole process of getting the data to the UI:
// start the loading on startup
service.fetchTweets();
The other two problems have to be configured when creating the items for the list. But wait, we don't create the list items ourselves. Something in the data binding layer is doing that for us and that something is the controller we created. So we need to tell it how to configure the UI elements it is creating. For exactly such scenarios the controller has a way to handle code from the user, a delegate. You can implement the delegate method configureItem to manipulate the list item the controller creates:
controller.setDelegate({
  configureItem : function(item) {
    item.getChildControl("icon").setWidth(48);
    item.getChildControl("icon").setHeight(48);
    item.getChildControl("icon").setScale(true);
    item.setRich(true);
  }
});
You see that the method has one parameter which is the current UI element which needs to be configured. This item is a list item which stores its icon as a child control you can access with the getChildControl method. After that, you can set the width, height and the scaling of the icon. The last line in the configurator set the item to rich, which allows the text to be wrapped. Save your file and give it a try!
Now it should be the way we like it to be. Sure it's not perfect because it has no error handling but that should be good enough for the tutorial.
As you have seen in the last paragraphs, creating the data access layer is not that hard using qooxdoo's data binding. That is why we want you to implement the rest of the application: Posting of tweets. But I will give you some hints so it does not take that much time for you.
That should be possible for you right now! If you need to take a look at an implementation, you can always take a look at the code on github or fork the project.
That's it for the third part of the tutorial. With this tutorial, the application should be ready and we can continue our next tutorial lines based on this state of the application. As always, if you have any feedback, please let us know!